Depth-of-field preview
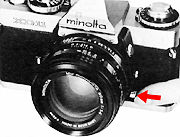 |
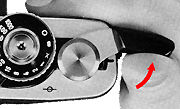
In either aperture-priority or manual mode depth of field at any aperture and focusing distance can be previewed visually by pushing the stop-down button (the button at the lower left in front of the camera) all the way in. This will stop the diaphragm down to the aperture corresponding to the f-number preset on the aperture ring, allowing you to see through the viewfinder how much of the subject is acceptably sharp. |
Note: when
you activate the stop down button, the viewfinder will considerably dimmer if you
are using an aperture other than the maximum aperture of the lens in use, but you
can notice the greater zone of sharpness presented than a maximum aperture.
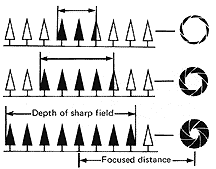
Depth-of-field scale
There are times where you need not have to use the stop down lever to visually check
the depth of field. Most manual focus lenses have excellent visual guide engraved
on the lens to indicate a rough estimation of the depth of field given an chosen
aperture value. The near and far limits of acceptable sharpness can be determined
from the depth-of-field scale on the lens barrel. With the lens focused at a given
point, the image will be in satisfactory focus from the nearer value to the farther
value on the distance scale indicated by the depth-of-field scale marks for the aperture
to be used.
 |
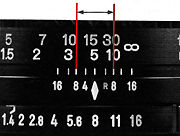 |
For example, if a 50mm lens is
focused at 5m (about 16 ft.) and the aperture is f/8, the appropriate graduations
to left and right of the Index on the depth-of-field scale indicate acceptable sharpness
from about 3.4m to 9.7m (approx. 11 to 32 ft.)
Infrared index
Other than the considerate depth of field scale, there is another red mark at the
lens barrel which indicate the infra red film focusing index. But if you are using
an APO lens or a reflex mirror lens with a color film, please use the normal focusing
index instead of the infra focusing index. Because APO or ED lenses are highly corrected
lenses for chromatic aberrations and mirror lens doesn't exhibit such optical 'defects'
and thus no compensation is required.
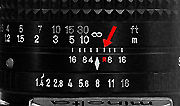 |
For proper focus when making black and white pictures with infrared radiation, first focus your subject with visible light as described above, then attach a red filter and turn the focusing ring to the right to align the point of proper focus on the distance scale with the index designated with small red "R" in the depth-of-field scale. |
When making color pictures, follow
the film manufacturer's recommendations to set focus.
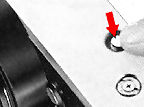
Film-plane index
The symbol on the camera top plate to the right of the viewfinder indicates the exact plane occupied by the film in the camera. This can be used to measure distance from subject to film.
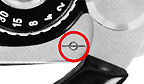 |
With modern close up or duplicating accessories available, making this feature less functional - but during those early days, it is used to measure exact film to film plane to determine exposure compensation manually. |
Rewind and Unloading Film
 |
|
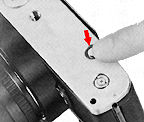
| 1. Push the film-advance release. | 2. Unfold the rewind crank and turn it in the direction indicated by the arrow on it until the red Safe Load Signal bar moves out of the window to the left. You will then feel tension on the film increase and disappear and the crank will turn freely. |

3. When you are certain that the
film is completely rewound, pull out the back-cover release knob to open the back
and remove the cartridge.
Caution: Film should be handled and unloading done
in subdued light - at least shaded from direct sunlight by the body.
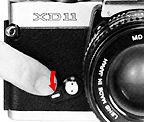 |
Self Timer |
 |
Multiple Exposures
Just like many cameras in the '60 & '70, preparing camera for multiple exposure can be a little uncomforting as with those manual focus cameras of the eighties because it lacks a dedicated multiple exposure lever or button to activate. Most cameras need to make use the rewind button to disengage the film to perform multiple exposure operation. In this case, the XD-7 has the conventional way of performing the task in that manner. Reminder: before you do that, please memorize what frame number is the exposure - it will provide a better user with operational confidence.
To intentionally make more than one exposure on a single frame of film:
 |
|
1. Make the first exposure in the usual way.
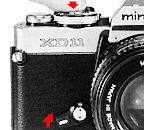
2. Push the film-advance release on the bottom of the camera. (Do not continue depressing it while film is being advanced.)
3. Operate the film-advance lever. This will cock the shutter for the next exposure, but the film will not advance since the release has been pushed.
4. Make your second exposure.
5.Then repeat steps 2 and 3 above as many times as desired to make further exposures.
6. After the last multiple exposure, advance film to the next frame in the usual way without pushing the advance release.
Note: Exposure adjustment if and as desired for multiple exposures with the camera on either automatic modes or on metered-manual mode can be made by means of the exposure-adjustment control.
| Previous | Next | Flash, Databack, Power Winder and remote cords
| Back | to Main Index Page of Minolta XD-7
| Minolta XK/XM/X1 | Minolta X-700 | Minolta Maxxum 7000 |
| Message Board | for your favourite Minolta XD-7/XD-11 SLR camera(s)
| Message Board | for your Minolta Optics in a shared environment
| Message Board | Specifically tor Dispose or Looking for Minolta Photographic equipment
Home - Photography in Malaysia |
Copyright © 2000 leofoo® MIR Web Development Team
Credit: Satosh Oka for some of the very high quality images for the Minolta CD-7 and XK Motor used in this site. Oleg Volk, who has offered some help during the initial stage of development of this site; Stephen Schwartz on the few new images of XK; Mark Wasmer for the original Brouche of the few Minolta cameras; Dick Sullivan whom I used some of his info as reference in this site; Mr Poon who has helped me eith some of the images used in this site. Minolta, XD-7, XK, XM, X1, Rokkor, MC lenses are either registered tradenames or trade mark of Milnolta Optical Co. Ltd, Japan. Asite dedicted to all Minolta fans worldwide.