|
|
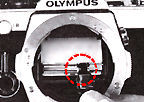 |
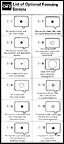
Interchangeable Focusing Screens Caution: This procedures may demand a safe and experience photographer to perform the task, although the system Olympus designed was with user friendliness in mind, but if you are not too familiar with changing the screen yourself, please handle with extreme care. The OM System Focusing Screens provide you with the ultimate in focusing versatility. There are optional Screens available to suit virtually every picture taking situation. The optional Focusing Screens come with a special tool. To remove the Focusing Screen: |

 PDF Format (184k) |
|
IMPORTANT: Although the above procedure could be done with
fingers, the use of a pair of tweezers is a must, because changing Focusing Screen
is a procedure to be handled with great care. Trying to change Screens with your
finger can result in fingerprints and costly damage to the surface of the Screen.
Should this occur, cleaning or repair MUST be handled by an authorized service center.
Such damage is not covered by the product warranty. *
If there is dust or dirt in the viewfinder, use an air blower to remove it. Never
wipe the surfaces of the screens, prisms, or mirror with cloth or paper. * The meter needle does not indicate
proper exposures for manual exposure photography when the 1-5,1-6,1-7, or 1-9 Focusing
Screens are used, although they produce an extremely bright viewfinder image. Proper
exposures are obtained with these Screens in automatic photography, however, the
shutter speed scale in the viewfinder does not give an accurate indication of the
actual shutter speed used during exposure.
Motor Drive and Power Winder: The OM Motor drive Group has the option
of two slower winders (Winder 1 & 2) and the high speed (Motor Drive 1 &
2) to be used with the OM2. The respective Instruction manuals are also available
in this site the Motor drive Group section.* More detailed info is available (4
Parts)
Automatic
exposure control makes the OM-2 ideal for use with the OM System Motor Drive Group.
The motor-driven OM-2 has many exciting applications in various fields such as sports
photography, action portraits, copy work, wildlife photography, time-lapse photography,
etc. By automatically advancing the film and cocking the shutter, the motor drive
allows the photographer to shot a series of pictures that might otherwise be lost
through the time-consuming manual method.
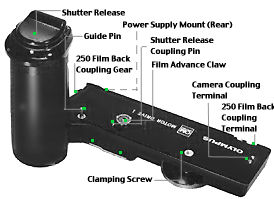 |
Approximately half the weight of a conventional motor drive unit, the OM System Motor Drive Group is specifically tailored to the compact size of the OM-2 body. The OM-2 with motor drive weighs slightly more than the conventional 35mm SLR camera without motor drive. In addition to its compact size and weight, the OM System Motor Drive excels in performance. The basic Motor Drive package can provide operation up to 5 frames per second (5 fps) at optimum* condition for sequence operation, has single frame release capability, and offers more motor drive sequence applications over a wide range of shutter speeds. |
With the automatic
exposure control, the motor driven shutter continuously adjusts for any changes in
light to assure correct exposure for each frame, even at the maximum rate of five
frames per second. The basic Motor Drive package consists of the OM-2, Power Winder
1 (2), Motor Drive 1 (2), and the M. 18V Control Grip 1 or M. 15V Ni-Cd Control Pack
1.
 |
* Optimum conditions for sequence operation: Maximum framing rate varies with temperature, types of film and batteries, etc. The word optimum implies normal temperature, shutter speeds of 1/500 second or faster, and using the M. 18V Control Grip 1 containing fresh alkaline batteries. Cartridges with smooth film movement must be used. |
 |
Operation of Motor Drive Basic Units |
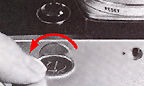
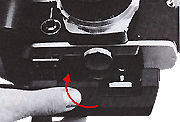
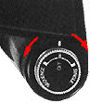
Attaching the Motor Drive [1]. Remove the motor drive socket cap. Remove the motor drive socket cap from the camera base plate by rotating it counterclockwise with a coin. To replace the cap, align the index dot on the cap with the index dot on the camera, press and turn the cap clockwise with your finger to engage the threads and then continue turning with a coin until tight (less than a quarter turn). |
 |
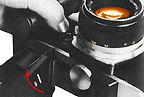
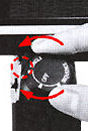
[2]. Attach the Motor Drive Insert the motor drive guide pin into the guide pin hole on the camera base plate. To assure proper connection, adjust the position of the motor drive until it is flush with the camera. Turn the motor drive clamping screw clockwise until the motor drive is securely attached to the camera base plate, |
 |
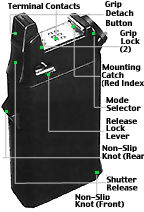
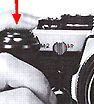
Attaching the M. 18V Control Grip [1] Remove the battery holder, insert twelve 1.5V alkaline batteries into the battery holder, and reinsert the battery holder into the control grip. [2] Align the red index line on the rear of the control grip with the red index line on the rear frame of the motor drive unit until the mounting catch is engaged. [3] Carefully push the control grip forward until it snaps into the front of the motor drive. |
Important: Always store the socket cap in the same place to avoid loss. * After removing the motor drive from the camera, be sure to replace the socket cap to keep the camera free of dust and dirt, and to prevent the possibility of stray light entering the socket and fogging the film. * Do not remove the socket cap when you do not use the motor drive. |
 |
Attaching the M. 15V Ni-Cd Control Pack 1 Prior to use, the Control Pack should be checked to insure that it has been adequately charged. If its charge is inadequate, use the M. 15V Ni-Cd Charger. Aligning the red index lines of the Motor Drive 1 and the Control Pack, engage the mount catch. Then push the Control Pack forward and upward until it snaps on the motor drive, then clamp securely. |
 |
 |
Photography with the Motor Drive Units |
 |
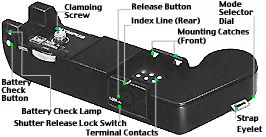
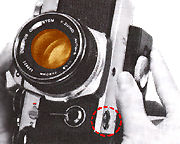
In either mode, automatic exposure control is possible in the full range of shutter speeds and manual exposure is possible from 1 second to 1/1000 second. Set the mode selector to the "OFF" position when the Motor Drive 1 is not in use.[3] You may use either the shutter release on the Control Grip 1 or the shutter release on the Motor Drive 1 to trigger the shutter. It is generally more convenient to use the shutter release on the Control Grip when the camera is held in the horizontal position and the shutter release on the Motor Drive 1 when the camera is held in the vertical position. |
 |
 |
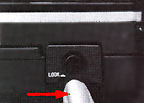
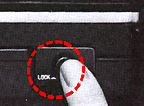
Using the M. 1 5V Ni-Cd Control Pack 1 [1] Slide the shutter release lock button on the Control Pack to the unlock position.* This device is provided to lock the release button on the Control Pack for unintentional shutter release in general or when a replay cord is used, etc. [2] Pull and turn the mode selector until it clicks to either "SINGLE" or "SEQUENCE". |
 |
 |
[3] You may use either the shutter release on the Control Pack 1 or the shutter release on the Motor Drive 1 to trigger the shutter. It is generally convenient to use the shutter release on the Motor Drive 1 and the shutter release on the Control Pack 1 for the use of the 250 Film Back 1. Note: In either mode, setting the mode selector is the same with the Control Grip. |
 |
Loading the Film Always load your camera with film after the Motor Drive has been attached. This eliminates any possibility of film fogging from the light that leaks into the camera as the Motor Drive is attached. If this is not possible, attach the Motor Drive unit in a dimly-lit area. |
| Previous | Next | 6/10
| Back | to Index Page of OM2(n) Instruction Manual
| Back |
to Index Page of OM2(n)
| Back |
to Main Index Page of OM1(n) & OM2(n)
Olympus
OM-2(n):
Camera
Operations
(9
Parts)
| Other
Issues
(5
Parts)
Specifications: HTML | PDF (48k) Main Reference
Map: HTML | PDF (203k)
Olympus
OM-2 SP:
Camera
Operations
| Other Issues
Specifications: HTML | PDF | Main Reference Map: HTML | PDF
Olympus
OM-1(n): Camera Operations (6 Parts) | Other
Issues
(5
Parts)
Specifications: HTML | PDF | Main Reference Map: HTML | PDF (217k)
Shared
Resources:
Supplementary
articles:
TTL
Metering,
Depth
of Field,
Shutter
Speed
& Aperture
Motor
Drive and Power Winder: Main Index Page (4 Parts)
Motor
Drive 1
| Motor
Drive 2
| Winder
1
| Winder
2
Flash Photography: Main
Index Page
(4
Parts)
T45 | T32 | T20 | F280 | S20 | Qucik AUTO 310 | QA300, 200, 200S
Macro-Photography: Main
Index Page
(3
Parts)
Macro Flash Units: T10 Ring Flash, T28 Twin, T28 Single,
T8 Ring Flash
Accessories: Databack
1-4
| Screens | Finder Accessory | Remote | Cases
Zuiko Lenses: UPLOADED !!
| Message Board | for
your favourite
Olympus
OM-1(n)
and OM-2(n)
series
SLR Camera models
| Message Board | for your Zuiko Optics in a shared environment
| Message Board |Specifically for Dispose or Looking for OM Photographic Equipment
Home - Photography in Malaysia |
Copyright © 2000. leofoo ®. MIR Web Development Team.
Site
& Message Board Maintainers:
Mr. Simon Evans <ruralwales@yahoo.com>; Mr. Rick Oleson
<rick_oleson@yahoo.com>; Mark Dapoz
<md@dementia.org>;Mr. Rick Oleson
<rick_oleson@yahoo.com>; Mr. Bruce
hamm <bhamm@magma,ca>
My
old time buddy, Ahmad
Ikram,
Dr of Rubber Research Institute (RRI), Malaysia
who shares the same passion with me and also left his collection of OM-1n, OM-4 bodies
alsong with a Motor Drive 1 preparing some images appeared in this site. Mr Poon
of Foto Poon, Ipoh, Mr Richard, Ampang Park, Mr Lim and Miss
Jenny of Foto Edar for their generosity for their OM1(n), OM2n camera and some
Zuiko lenses. Mr KKLow for some of his earlier images on the OM-1. Miss Wati and Mirza for helping me
to convert this Operation Manual into a HTML format. Mr MCLau for rectifying
some mistakes made on the earlier preview sites. Site created 'unfortunately' again
with a PowerMac
A
personal tribute to the creator of the OM system and also a site dedicated to all
the fans of Olympuses and Zuiko Optics worldwide. Olympus
is a registered tradename of Olympus Inc, Japan.